
Espresso Machine Cleaning & Maintenance
Clean brewing equipment is an absolute necessity for the best coffee flavour, so it's surprising how often I see various brewers layered with old coffee gunk. The problem is simple, coffee oils tend to stick to most surfaces, and when they oxidize they form a tarry coating.
Oxidized coffee oils also have a horrible rancid taste, which easily contaminates a fresh brew. Prime culprits are often the filter screens of plungers and moka pots and the filter holders in drip brewers. All of these can usually be easily removed for a good scrub with hot water and detergent, followed by a thorough rinse.
When it comes to espresso machines, though, the cleaning requirements get a little bit more complex. First, the most used bits, the portafilter, filter baskets, shower screen and gasket should be cleaned every day. You can get special espresso machine cleaners which are mostly trisodium phosphate, but a good wash in hot water and detergent will do for the portafilter and baskets. The showerscreen can be wiped with a soapy sponge, as can the rubber gasket. The gasket can also be cleaned of grounds with a brush, a bent "kiddy" toothbrush works well.
Remember to rinse everything clean; you don't want detergent flavoured coffee!
About once a month the showerscreen can be removed for cleaning. Use a scotchbrite with detergent to clean the group, and if the screen is really dirty and the holes are blocked, a wire brush can work wonders. When you replace the showerscreen, the screw should only be "finger tight".
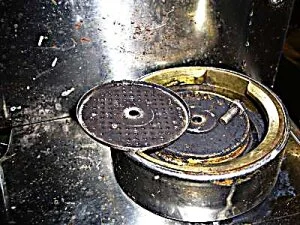
E-61 group machines like the Butterfly don't have flat showerscreens held on by screws. Instead the screen is part of a "cup" which is held in place by the group gasket. You can generally lever both the cup and the gasket down with the aid of a blunt flathead screwdriver against the side, or the tip of a teaspoon. Both the screen and the gasket can be cleaned.
In between the daily and monthly cleaning machines with solenoids can be "backflushed" about once a week to clean out the showerscreen and water path to the solenoid. Sometimes the showerscreen will be so neglected that no amount of detergent or scrubbing will clean it. In this case the only way is to hold the screen over a gas flame and burn the crud out of it, but this will reduce the screen life.

We see too much of this on machines sent in for repair.
Sometimes the shower-screen is so clogged water barely flows.
Lelit group and showerscreen

Removed and cleaned
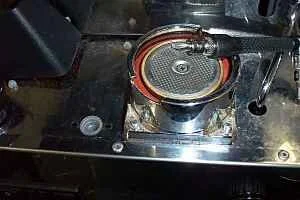
Silvia group and showerscreen

Cleaned (note water distributor washer)

The E-61 showerscreen and gasket as they come from the group.

Cup and gasket separated.
How to Back-Flush

Silvia Portafilter with blind filter basket

Lelit Portafilter with blind filter
Make sure machine is properly warmed up, water tank is full and drip tray is in place.
Run some hot water through the group.
Place the blind filter basket in the portafilter and add 1/4 teaspoon of Espresso Machine detergent.
Lock the portafilter FIRMLY into the group.
Turn on the brew switch and allow pump to run until it goes quiet, or 15 seconds max. Turn off.
Turn on brew switch for 3 seconds, then turn off. You should get a whoosh of hot water and detergent from the valve into the drip tray.
Leave machine alone for 5 minutes, then repeat above.
Another 5 minutes and repeat.
Remove portafilter, run water through group for 5 seconds. Rinse out blind filter under tap, empty and rinse drip tray then return to machine and repeat procedure without detergent and without waiting between flushes.
Finally, run 100ml of water out of the group to rinse.
De-Scaling
Machines should be de-scaled about every 6 months or so, more frequently if you're in a hard water area, yearly in metro Melbourne.
You can use expensive commercial descaler or plain citric acid from the supermarket. Descaling single boiler machines with tanks is pretty easy, as long as they have brass or stainless steel boilers.

$1.50 for 75g…cheap!
First, remove the showerscreen (and the water spreader washer on the Silvia).
Simply dissolve 10g of citric acid in a cup of hot water, then add cold water to make the quantity up to a litre. Replace any water in the tank with the citric acid solution, then run 300ml (one and a half cups) of water through the group, leaving the machine on.
Wait 20 minutes then run another 300ml out, this time through the steam wand, then turn the machine off.
Empty any remaining solution from the tank, flush with clean water, refill and run about a litre of clean water through the machine, alternating between the group and the steam wand.
Replace the showerscreen (and washer spreader) and you're ready to brew again.
HX Machines
Heat-Exchanger machines like the laScala Butterfly can be a bit more difficult, because the boiler water and brew water are kept separate.

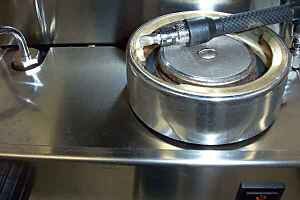
The vacuum breaker valve is the silvery one on the left.
The way I do it makes it pretty simple, but it does require some minor tool skills.
First, with the machine cold, I prepare 2.5 litres of descaling solution (as above) and fill the tank with it.
Then I take the top plate off the machine.
Next, I remove the top of the vacuum breaker valve (see pic below) using a socket spanner.
Then I use a thin hose to syphon all of the water out of the boiler, after which I replace the top of the valve.
With the tank and hoses back in place, I turn on the machine. The autofill function immediately activates the pump and fills the boiler with descaling solution.
As soon as the boiler is full, I start running water from the group, until I can taste that the sour citric acid is coming through. At this point I stop the water from the group and wander away for 3 hours or so, leaving the machine on and hot.
At the end of 3 hours I turn off the machine and allow it to cool.
Once cool, it's off with the top of the valve and syphon out the descaler. I use a small funnel to add about 0.5 litres of fresh water to the boiler to rinse, then syphon it out again, then replace the valve top and the top plate.
I refill the water tank with clean water, turn on the machine to fill the boiler, and once again flush the group until the water coming through no longer tastes like lemon juice. As I said at the start, it's really pretty easy, much harder to describe than to do.
Why Bother?
Cleaning and descaling will certainly make your coffee taste better, but the main benefit is that the lifespan of your machine will be increased.
A lot.
It's a bit like a car, service it regularly and it lasts, neglect it and it will break down. The majority of the machines we see for repair are, frankly, filthy.
Most of the extremely expensive labour cost involved in the repairs is incurred during the cleaning. It's a bit like paying a plumber to clean your toilet, and just as expensive.
Group Gaskets
The rubber ring up inside the group, aka the group gasket, is an absolute necessity for successful espresso brewing.
It holds the pressurized water in the portafilter and ensures that it's pushed through the coffee puck. Since it is subject to heat, moisture, mechanical and hydraulic pressure, the gasket is also usually the first thing to wear out. So much so that group gaskets are regarded as "standard consumable items", i.e. stuff the owner is meant to change on a regular basis.

The easiest way to change the gasket on Lelit and other 57mm group machines is to remove the group collar using a ground down 8mm socket.

Once removed, it's easy to clean up the group and the collar and replace the gasket.

Hardened 8mm thick gaskets in 58mm group machines are best extracted using self-tapping woodscrews.

Once the old gasket is out it's time to scrape, scrub and flush the groove before the new gasket goes in.