
Lelit Boiler Replacement Guide
Below is a photo guide to replacing the boiler element in the Lelit PL Series Espresso Machines. This particular repair was carried out on a Lelit PL042QEAU machine, 2007 Model. Newer machines may vary slightly.

To begin with, here are all the tools needed for the job. From left to right, a 2.5mm allen key, a small diameter phillips head screwdriver, 8mm (ground down) socket spanner, 11mm, 12mm, 15mm and 17mm spanners, pliers and a scotchbrite pad.

And here is the machine to be repaired, on the bench and UNPLUGGED from the power supply. Symptoms are the immediate tripping of circuit breakers as soon as the machine is plugged in and switched on.

We start by removing all the loose bits from the machine. Take any beans out of the hopper, note the hopper setting then pull it straight up to remove it. Then take out the tank, lid and drip trays.

We now unscrew the two small phillips head screws holding the top on, and pull off the filter on the water inlet pipe.

Now it's possible to lift the top off the machine. Carefully ease the hoses out of their slot. WARNING!! The body panels are laser cut stainless steel, and the edges are razor sharp! Take care not to get cut!

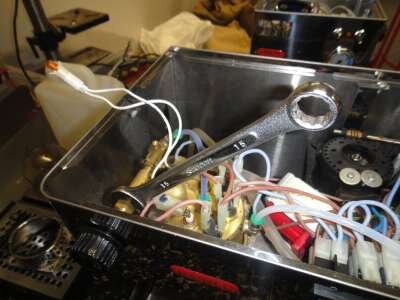
This gives you access to all the machine's innards. Note the purple colour of the tube on top of the boiler ,,, it's a sign that the machine hasn't been backflushed for quite a while.

At this stage we turn the machine upside down, and using our trusty ground down 8mm socket spanner, undo the 4 group nuts and remove the group.

The 2.5mm allen key is used to remove the showerscreen, by undoing the central screw.

This also provides the perfect opportunity to clean up the group, group collar and showerscreen, and change the group gasket. The scotchbrite is quite effective here.

Next comes the indicator lamp. To remove it, you hold the orange cover on the outside of the machine in place with a finger, then gently pull away the fitting inside the machine.

Then you stick the orange cover back into the fitting so you don't lose it! Removing the steam valve shaft is next.
Use the 15mm/17mm (it varies) spanner to undo the split nut holding in the shaft, then remove the nut.

Once the steam shaft is out you can refurb it, change o-rings etc.
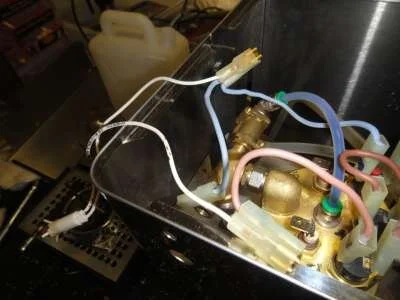
Now it's time to remove the electrical connectors from the element posts and the solenoid coil. When re-assembling, remember that the brown wire goes to the outside coil connector.

Removing the thermostats is the next step. First loosen them with a 17mm spanner. Then, one at a time, remove the connectors, unscrew the thermostat, replace the connectors. Saves confusion over which wire goes where.
Finally, remove the earth wire from its spade connector and the boiler is free of all electrical connections. Plumbing connections are the next step.

Removing the teflon pipes from the quick release connectors is a matter of pressing down the green plastic surrounds (using the tip of the pliers) while grasping the hose with the scotchbrite and pulling it up and out. You put them back the same way, press and push in hard.

The final hose is the outlet of the solenoid 3-way valve that goes down into the drip tray. Lift up the boiler about 3 cm then gently work the rubber fitting off, using the pliers to grasp it.

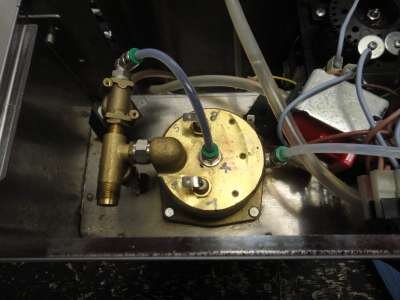
Now the whole boiler and steam assembly can be removed simply by lifting it up. Some manoeuvering of the steam wand may be necessary. Invert the boiler to drain it.

The boiler disassembly process can now begin. First, the teflon pipe from the top fitting can be removed with pliers and scotchbrite.

Then the fitting in the middle of the boiler (and usually the pipe that goes with it) can be unscrewed using the 11mm spanner. THIS MUST BE DONE BEFORE UNSCREWING THE BOILER BOLTS!

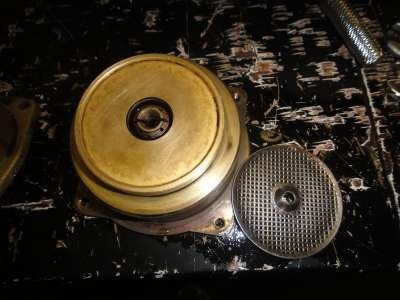
Unscrew the 4 x 8mm boiler bolts and seperate the halves. In this case we see a well cooked element (the colour gives the clue) and all the bits of burned off copper in the boiler base.

Undo the element post nuts with the 12mm spanner and remove the dead element, throw away the old boiler gasket and get ready to clean.
Using rubber gloves, scotchbrite, a stiff brush, boiling water and espresso machine detergent, make sure the boiler halves are clean inside and out.

Here we have the standard element kit: element, o-rings, boiler o-ring. We've added a new group gasket to the base.

The element goes in with the connectors pointing towards the steam valve.

Tighten up the nuts, then pop the new boiler gasket into the slot in the base.

Join the two halves together and loosely screw in the bolts. The earth connector bolt is at right rear. Then loosely screw in the central pipe and fitting. Tighten all the bolts, then finally tighten central pipe and fitting all the way.

Put the boiler back in the machine and begin reconnecting, starting with the solenoid valve hose. Begin electrical reconnection with the reset thermostat at back. Be careful not to overtighten the soft brass thermostats. Don't forget to reconnect the earth and solenoid wires. Replace steam valve shaft and nut. Cover element connections with insulating tape before leak testing.

With the element still not connected, fill the boiler and check for leaks. Turn on the "Hot Water" switch with the steam wand closed for maximum operating pressure. If there are no leaks, refit the group collar and showerscreen, then reconnect the element. Once the machine has heated, detergent backflush. After backflushing, replace the indicator lamp and button up the machine.
That's really all there is to it!
Testing (after repair, but before putting the top back on) is essential, and we usually run a steaming test as well, after the backflush routine.
Always unplug the power prior to removing or replacing the top, and be careful not to let the sharp edges rub on internal wires and hoses.